Translations by gtranslate.io
Sidebar
manual:user_guide:tracks:management
This is an old revision of the document!
Table of Contents

Tracks & Routes Management
Data Manager
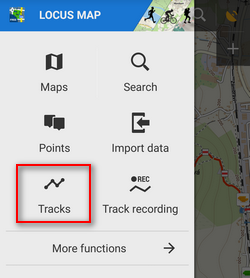
Tracks/Routes in Locus Map are managed in Tracks tab of the Data Manager. In default settings, the Tracks tab can be accessed from:
- Main menu > Tracks
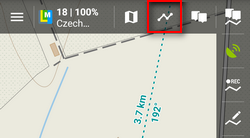
 For even quicker access you can add
 ![]() “Tracks” button to the Function panel at the top or right edge of the display.
“Tracks” button to the Function panel at the top or right edge of the display.
Tracks Tab displays all tracks and routes in a structure of folders and groups of folders. Each folder line consists of an icon, a folder name, number of visible/stored tracks and and action menu button.
Tracks & Routes Folder
Folder icon
Tapping it visualizes all tracks in the folder on the map. Re-tapping hides them all. If you previously displayed only some tracks from the folder, tapping offers to display your previous selection or all tracks.
Visualizing too excessive number of tracks may slow down response of the application.
Folder name
Tapping it unfolds a list of tracks/routes in the folder.
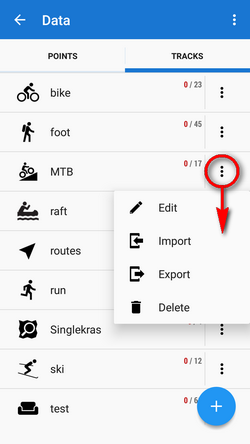
Action menu button
- Edit - here you can insert folder into a group if there is any created and edit folder icon, name and style of included tracks on map
- Import - adds new tracks into the folder by importing them
- Export - exports all tracks in the folder, see more in Tracks Export
- Delete - deletes whole folder
Each group line contains the group name and number of folders allocated in it.
![]()
Adding new tracks/routes and folders
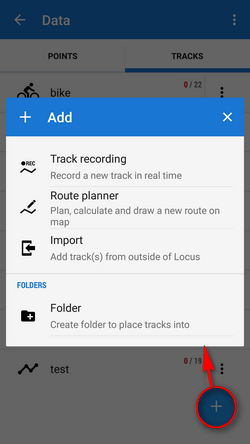
 Track recording - switches to the maps screen and launches the track recording dashboard. Pressing start begins to record the track from your current GPS position. More about track recording >>
  Route planner - opens screen for planning a new route on map. More about Route planning >>
 Import - opens a file browser where you can select a route from out of Locus. More about importing routes >>
 Folder - creates a new track/route folder - tracks/routes with the same properties (activity, style, purpose…) are stored in folders. Folders can be handled as one object and some operations can be performed on tracks in them - sorting, filtering, changing style etc.
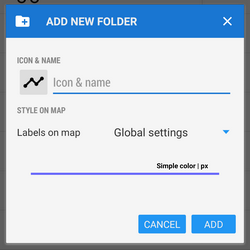
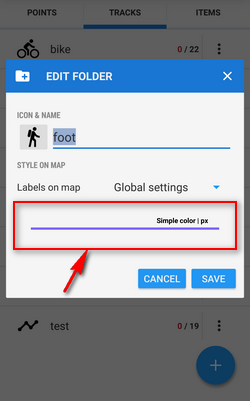
- Icon & Name - here the folder icon and name is set. There is a wide selection of Locus and Garmin styled icons available for precise distinguishing of folders.
- Style on map - sets the style for all tracks/routes in this folder
- Labels on map - sets appearance of track/route pop-up labels:
- Global settings - the track labels behavior submits overall setting of Map Objects
- Do not show - label is activated only by tapping the track
- Simple - track starting point displays a simple label with track name
- Complex - track starting point displays a label with the track name, length, positive and negative elevation.
- Line style sample - tapping it opens a new dialog to set style attributes (color, width, pattern…) of all tracks in the folder
![]()
Top panel menu
- Deselect all - quickly deselects (makes them invisible on the map) all selected tracks/routes across all folders
- Groups - folders can be further structured into groups. Tap
 to create a new group. After creating it you can rename or delete it in the same window.Groups are available only in Locus Map Pro version
Tracks & Routes List
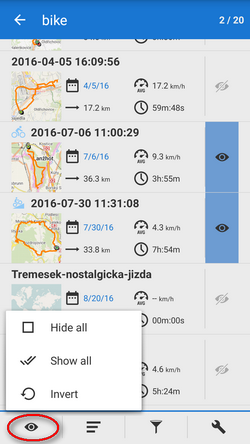
After tapping a folder the tracks/routes are displayed in a vertical list. The topbar displays visible/total number of tracks. Each line consists of:
- Track name - user-selected text or automatically inserted time stamp
- Track map thumbnail - mini-preview of the map with track - tapping it switches to the main map screen with the track on
- Date - date of recording/importing track or drawing a route
- Average speed - average speed of the activity made on track
- Length - distance traveled from start to finish of the track
- Time - time of the activity made on track
- “Eye” button - switch of in/visibility on map
Tapping the track line opens the track detail screen.
Tracks list bottom panel
The bottom bar contains following controls:
 Multi-track display selector - multi-selection of tracks to display or apply tools at:
- Hide all - makes all tracks in the folder invisible on the map
- Show all - makes all points in the folder visible on the map
- Invert - inverts current selection, useful when you want to select almost all tracks except some. Select those and then invert the selection.
 Sort by button:
- Sort by name - sorts tracks alphabetically
- Distance to start - sorts tracks by distance from actual map screen center (actual GPS position in case it is fixed and centered) to the starting point of the track
- Distance to end - sorts tracks by distance from actual map screen center (actual GPS position in case it is fixed and centered) to the ending point of the track
- Sort by creation date - sorts tracks by the date/time of their recording/import or drawing in case of routes
- Sort by length - sorts tracks by the distance from their starting to ending points
- Sort by travel time - sorts by the time of activity made on track
- Reverse sorting - switches sorting into reverse mode

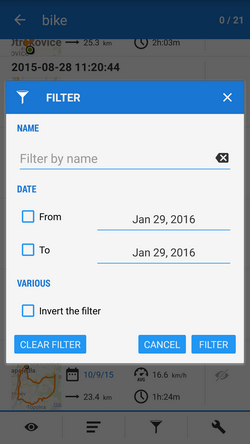
 Filter button:
- tracks can be filtered by their name and date and the filter can be inverted. Can be applied by folders only.
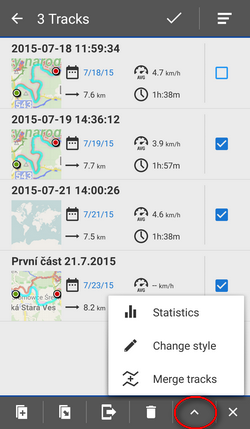
 Tools button - changes the top and bottom bars and displays other controls:
- top panel - displays number of selected tracks to apply tools to, sort-by button and confirmation button
- bottom panel:
 copy to - copies selected tracks to different folders
 move to - moves selected tracks to different folders
 export - exports selected tracks (see more in Tracks Export)
 delete - deletes selected tracks
 other controls:
 Statistics - opens a fullscreen window with common statistic of all selected tracks, concerning distance, track time, elevation gain and so on.
 Change style - changes color, width and other graphic parameters of selected tracks/routes
 Merge tracks - connects selected tracks into one. It is possible to choose order of connected tracks, merging with gaps and deleting original tracks
 aborts tools panel
Track & Route Map Label
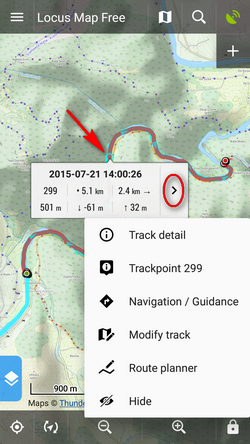
After tapping any part of a track on the map a label appears. It contains the track name, number of tapped trackpoint, distance to start, distance to finish, altitude and +/- elevation gain. There is also ![]() “more options” button:
“more options” button:
 Track detail - opens window with track details
 Trackpoint No. - opens a detail screen of the trackpoint - position on the map, coordinates, distance to start and to the end of track
 Navigation/guidance - opens another dialog offering two ways of guiding along the track:
- Navigation - turns the track into a route, generates voice commands and starts turn-by-turn navigation along the route. More about navigation >>
- Guidance - turns the track into a route and starts simple guiding along it (no voice navigation).
 Modify track - opens track/route in track editor (e.g. to fix the track)
 Route planner - opens the track/route in route planner so that changes are applied to its progress, length etc.
 Hide - makes the track invisible on map
Content of the popup label can be set in Locus settings > Maps > Points&Tracks > Tracks popup content
Tapping the track label or track line in the Manager launches the Track Detail Screen:
Track & Route Detail Screen

The track/route detail screen is divided into a few sections:
- top panel with the track name
- information tab that contains:
- map preview of the track. Tapping it switches into the map screen covering area of the track. The map preview can be switched off by tapping an arrow in the bottom right corner.
- date of creation, distance, time of activity
- track activity - selected manually before track recording or not specified (biking, hiking, running etc.). Important for overall statistics.
- track folder icon and name - tapping the arrow opens the folder
- style on map - color, width and style of the track line on map. Tapping it opens dialog setting the track style - line color, width etc.
- bottom panel:
 map switch - displays the map screen covering the track area
- Navigation/Guidance button:
- Navigation - turns the track into a route and starts turn-by-turn navigation with voice commands that are rendered according to the shape of the route. More about navigation >>
 Guidance - starts simple guiding along the track with optional sound and screen alerts of direction changes
 Guide reversely - starts guiding in reverse direction
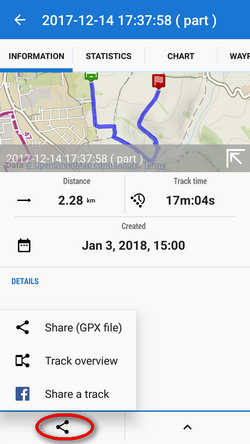
 Share - opens a menu of track sharing options:
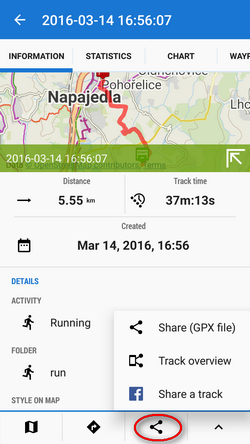
- 3rd party apps - if you have e.g. Google Earth installed, its button appears here for quick processing
- Share (GPX file) - quick export of the track/route into generally most common GPX format and sharing via all available services
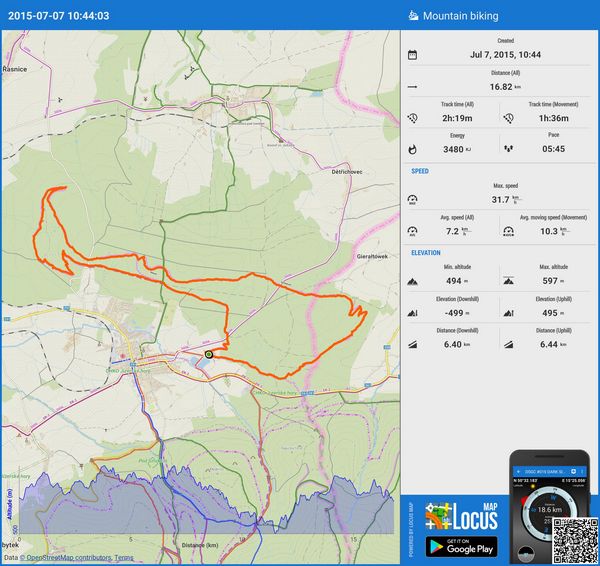
- Track overview - renders a hi-res image of the track map and its statistics and offers to share it via multiple services and social networks
- Share a track - quick sharing the track on Facebook
- editing tools
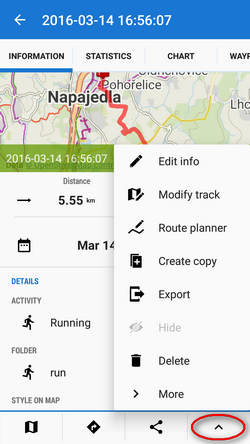
- creating a copy - ordinary or with reverse orientation for reverse navigation
- hiding - removing from map screen
- deleting - irreversible removing from the app
- more tools:
 - adding elevation Locus PRO only, analyzing track, area computation and calculating of estimated Travel time.
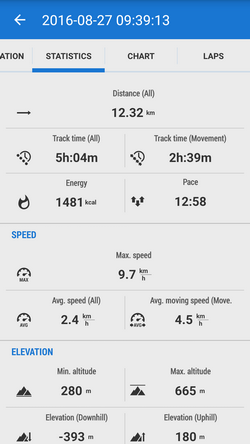
- statistics tab - displays detailed information on distance, elevation (routes), speed, pace, energy consumption etc. (tracks)
- chart tab - displays track chart. According to chart setting it can be elevation profile, speed profile etc. This option is available in Locus Map Pro only

 chart settings - settings of the chart axes - the X axis can display distance or time, two axes Y can display altitude, gradient, speed, heart rate, cadence (in case appropriate sensors are connected and active). Navigation waypoints (if there are any) can be hidden.
Default values are X - distance, Y1 - altitude, Y2 - empty. When the track is imported or drawn on a map without elevation data, the chart is empty.
 fit chart - fits chart into screen
 map - tap on chart to a specific place of track and tap map button to display the place on map
 ,
,  - zoom in/out - zooms the chart in/out
- waypoints tab - a list of waypoints on the track/route.
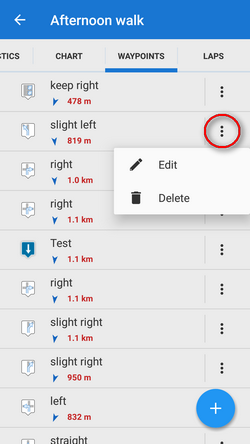
Each waypoint can be edited or deleted, new waypoints can be added by
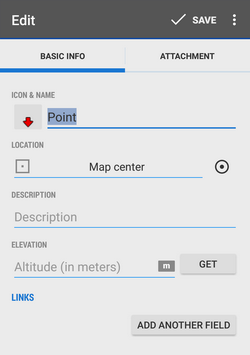
If you want to add an existing point from your database, tap and then select
  Points from the location selector:
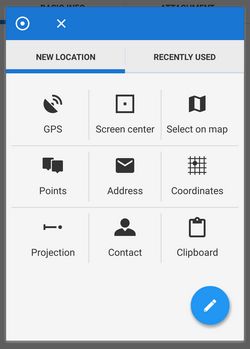
Then pick the point from your point manager folder. - laps tab - displays a table of pre-defined laps of the track - each lap distance, time, speed and gain. Tapping a lap shows it on map, red-highlighted lap is slowest, green is fastest.
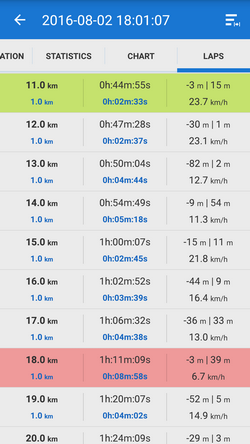
- lap definition - offers 1, 2, 5, 10 km and manual definition
Track/route analyzer
When you need to know statistics and charts of a particular part of the track or route, open the track in this tool. It's available in the tool menu:
- tap the track on the place from which you want to define the span
- tap the other point of the span. You can repeat this step and change the span definition.
- check the general stats and elevation chart in the bottom bar
When you want to see detailed statistics and charts, confirm your selection:
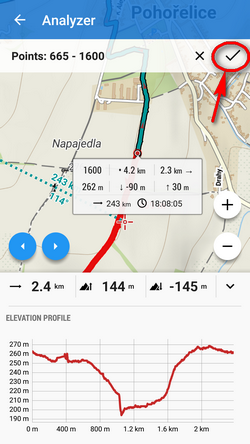
The selected track part is displayed in a new detail window with info, stats and chart tabs:
To share the track part, select an option from the Share menu:
To make a copy of the track part, to export it, compute the area covered by it or calculate its estimated travel time, select from the tool menu:
Track & Route Style
Each track/route in Locus has its color, pattern, width and other parameters. These parameters can be set in several levels:
Global style
Default appearance of all tracks and routes across the app can be edited in Settings > Maps > Points & Tracks > Track line style

These settings can be overridden by following:
Folder style
Tracks and routes stored in a folder in the Track/route manager can have unified style settings. These settings can be edited in the folder action menu:

Individual style
Style of individual tracks or routes can be edited in the track/route detail screen edit dialog:

To activate individual settings you have to switch off the folder settings (by this the style of the particular track/route automatically shifts to the global settings):

It is possible to change individual style of multiple tracks/routes:
- open a folder with tracks/routes you want to edit
- multi-select tracks for editing
- tap the tool menu from the bottom bar and selectChange style

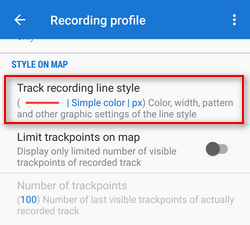
Track recording profile style
Style of recorded tracks can be set according to used recording profile.
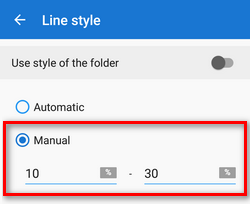
By default, recording profile style is overwritten by style of the folder where you store your recorded tracks. If you want to maintain the profile style, follow these steps:
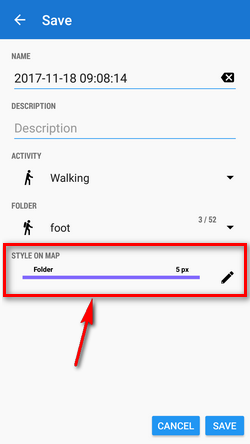
- tap the style line in the track-saving dialog when you stop a track recording:
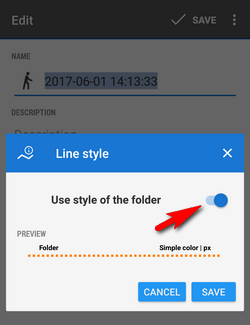
- switch off “Use style of the folder” and tap SAVE
Next time you will record track in this profile the style will be maintained and not overdrawn by the folder style.
Route planner style
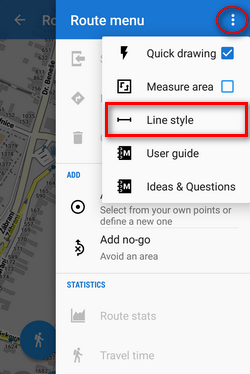
Option of styling route lines is useful for example when you need to display dynamically slope angle or altitude of the route. Line style editor can be launched from the route topbar submenu:
 Route planner route style is overdrawn by style of the folder you save your route into.
Track/route style summary:
Global style has the lowest priority in styling of tracks/routes. Folder style, recording profile or route planner style overrides it. Folder style overrides also recording profile and route planner style. Each track or route can be finally styled individually.
Style Editor
All buttons editing style on all levels - global, folder, individual or track recording profile - lead here:
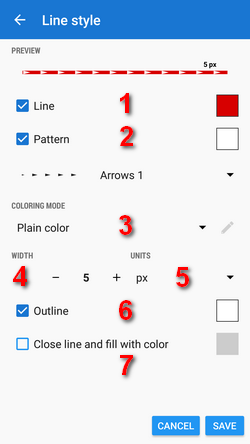 In order to differentiate among your routes and tracks or adjust their appearance according to used map you have vast options of styling them - you can adjust the line color (1), width (4) and outline (6), add pattern (2) from a great selection, color the pattern, set coloring mode (3 - plain color or some of dynamic coloring modes according to speed, elevation etc.) or automatically close the line and fill the space with color (7).
Line
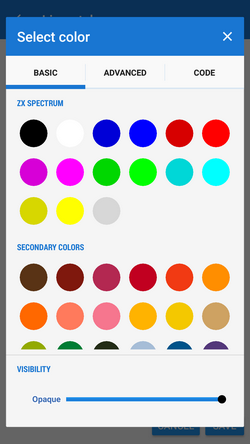
Line (1) can be colored in basic mode,
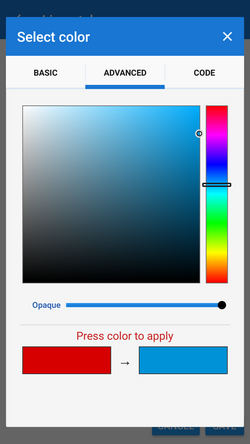
advanced mode with option to pick any of colors provided by your device,
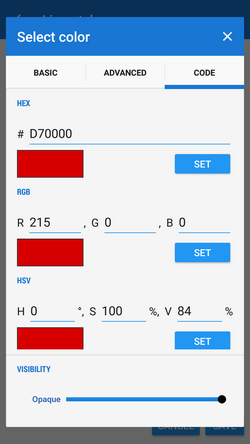
and code mode - just insert HEX, RGB or HSV code of the desired color:
 Its opacity can be adjusted from 100% to invisibility 0%
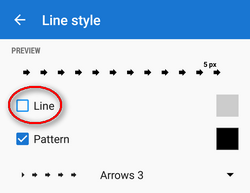
 or the line color can be switched off - only its pattern is visible:
Pattern
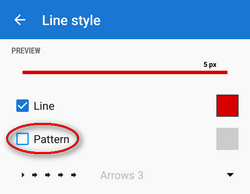
Pattern (2) has the same coloring options as the line - basic, advanced and code, see above. If you do not want to have patterned line, just uncheck the pattern:
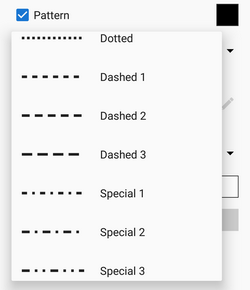
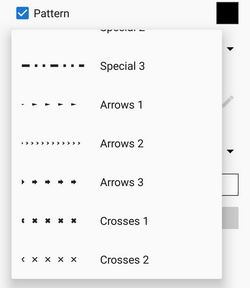
You can select from a vast array of patterns including arrows and crosses:
Coloring mode
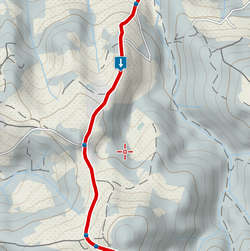
The track/route line can be colored (3) by plain color
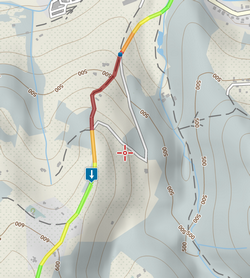
or dynamically - by speed, change of speed, altitude, slope, GPS accuracy, heart rate or pedaling cadence
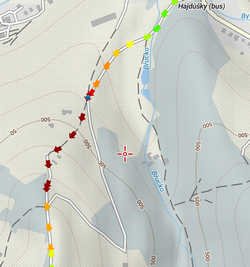
If you select a dynamic mode and switch line color off, the pattern is colored dynamically:
If you want to color only a certain range of altitude or slope angle you can define it manually:
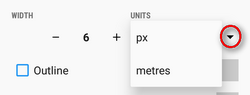
Width
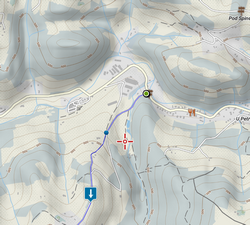
Width (4) of the track line can be set in pixels (screen related) or meters (real world related)(5):
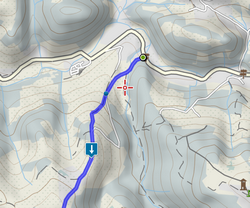
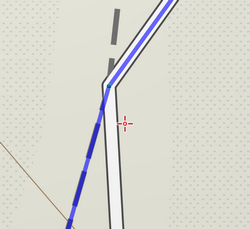
The first option displays the line in the same width across all map zooms. A line 6 pixels wide:
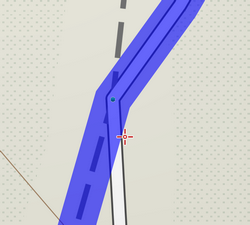
The same line 6 meters wide:
Outline
To enhance contrast of the line from the background map, you can add an outline (6). Coloring options are the same as for the line and pattern.
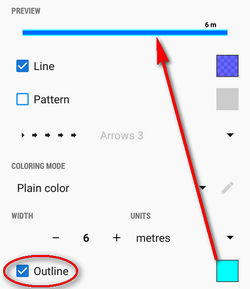

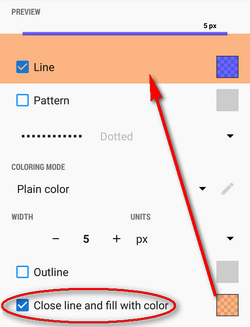
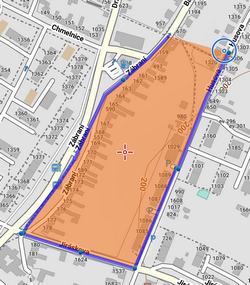
Close and fill with color
Quite a special feature for highlighting areas enclosed by a track/route (7).
manual/user_guide/tracks/management.1515057906.txt.gz · Last modified: 2018/01/04 09:25 (external edit)
Except where otherwise noted, content on this wiki is licensed under the following license: CC Attribution-Share Alike 4.0 International
