Translations by gtranslate.io
Sidebar
manual:user_guide:maps_mainscr_ctrl
This is an old revision of the document!
Table of Contents

Controlling
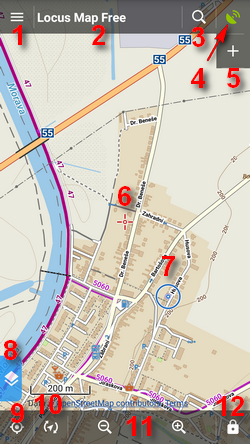
Locus Map main screen is displayed once application is turned on. It consists of the Map Window and controlling panels - Function panels (top, resp. right, see no.5), bottom map controlling panel and left Action panel (8). Top Functions panel is customizable and can be extended by another functions panel on the right (5). At the first start of the app the panel contains the Main Menu button (1), the Information Field (2), the Search button (3) and GPS button/indicator(4). The bottom panel controls the map – centers (9), rotates (10), zooms in/out (11) and locks it (12).
The center of the screen is marked by the cursor (6), your GPS position is marked by a circle with a hollow dot inside (7). The color of the circle varies depending on your GPS fix - blue is fixed. The narrower the circle, the more accurate your GPS fix is.
All panels can be hidden for larger map window - see the Maps Settings.
Main menu (1)
Under the top panel Main Menu button you will find a list of all functions and settings of the app and the entrance to the Locus Store.
 Headline items of the main menu can be edited, as you can see here >>
Information field (2)
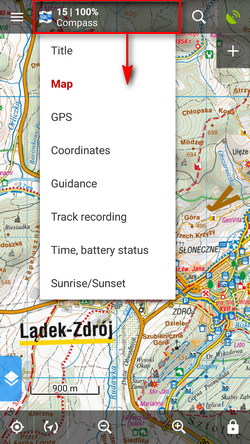
By default it displays the name of your app - Locus Map Free or Pro. Tapping it unfolds an offer of several other options to display:
- Map – format, name, zoom and zoom coverage of displayed map in %
- GPS – GPS accuracy, number of targeted/fixed satellites, speed and altitude.
- Coordinates – actual coordinates of the screen center
- Guiding – distance, azimuth and estimated time of reaching your destination
- Track record – recording time and distance
- Time, battery - current date and time, battery status in % and battery temperature
- Sunrise/Sunset - remaining time to either sunrise or sunset depending what is closer
Search (3)
By default, this button launches online address search powered by Google:
 By tapping the menu button in the topbar more searching options appear:
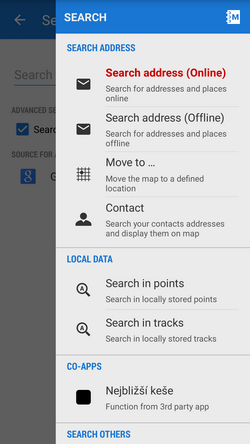 Select one of them. Later Locus switches directly the search option you chose for the last time. More about search >>
GPS indicator (4)
Its icon indicates your internal GPS status:
 - acquiring of location is disabled
 - searching for location but valid location not found yet, location on the map is marked by an orange circle
 - the same as above, but Internal GPS Auto-off is enabled (see more in GPS settings >>)
 - current location is valid (GPS is fixed), location on the map is marked by a blue circle
 - the same as above, but Internal GPS Auto-off is enabled (see more in GPS settings >>)
Tapping the GPS indicator switches on GPS skyplot and Compass screen. When you hold the GPS icon, a menu appears for fast switch of GPS status.
Panel containing buttons Search and GPS is customizable and you are able to set any of Locus Map internal functions to it. Just touch-and-hold any of the buttons and choose Modify panel. See more in Functions panel settings >>.
The main map window
In the basic setting, Locus Map selects the entry map according to the location of the app installation. In some countries, there are local providers, the rest of the World (or in case Locus Map can not acquire the user's location) is covered by the OSM hike&bike data:
- United States - USGS Topo
- Germany – OSM MTB Europe
- Hungary – Turistautak Classic
- Czech republic – SmartMaps
- Slovakia – Smartmaps
- other Europe – 4UMaps
- Japan - GSI standard
- New Zealand – NZ Topo
The displayed map setting can always be modified according to the user's needs via the Map Manager.
Depending on your GPS status the map is centered on your position or on the approximate center of the area the map data cover. The center of the map screen is marked by a cursor ![]() (6).
(6).
Controlling the map
Basically the map is controlled easily by simple tap gestures:
- touch and drag – map shift
- double tap and drag – map zoom
- pinch – map zoom
Otherwise the map is controlled by the bottom panel buttons:
- (9) centering button – it shifts the map so that your position on the map is in the middle of the screen depending on your actual GPS located position. If your GPS is off, it shifts to your latest located GPS fix position. If you touch and hold the button, a small menu appears:
- Hold map center - checking this option returns the map to your actual GPS position in the center of the screen after 5 seconds of inactivity. The method can be switched on in the Maps Settings menu as well.
- Set custom GPS marker position - enables to drag the screen center cursor to a custom position and confirm it in the top bar. Double tap on the centering button returns the GPS marker on its original position.
- (10) rotating button – by default offers two methods of viewing your actual position in accordance with your built-in compass. Either it is
 rotation of the map as a whole or displaying your
  eye view. When holding the button it asks which method you prefer to set as default for later use. The eye view is functional only provided the GPS is on.
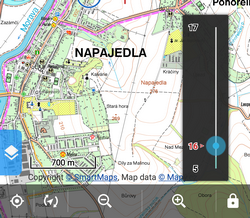
- (11) zooming buttons – the maps in Locus Map usually consist of a range of zooms, i.e. map scales accurately aligned one above another. The button - zooms out, i.e. switches to a smaller map scale, the + button zooms in, i.e. switches to a larger scale. When holding one of the buttons, a zoom slider appears – it displays the range of available zooms and your actual zoom position. The number of zooms corresponds to the standard you know from e.g. Google Maps:
- zoom 8 – major cities, highways and main roads
- zoom 9 – towns and secondary roads
- zoom 10 – 13 – villages, tertiary roads
- zoom 14 – 15 – streets
- zoom 16 - 17 - houses
- zoom 18 and above – house numbers (some maps)
- (12) lock button – it launches a menu offering
 zoom lock,
  lock of the screen and a
  magnifier lense. The zoom lock disables switching among the map zooms but allows enlarging the map view (at the cost of its blurring when extremely zooming in and illegibility of the map when extremely zooming out). The screen lock blocks map shift. A grey rectangle switch appears on the side of the window. To unlock the screen, drag it to the center. The last item of the menu, the magnifier, offers a circular window with enlarged map that zooms the area pointed on with the arrow of the tool. The zoom level of the enlarged area is the same. The tool is fixed in the upper left quarter of the map so if you want to point it on a different area, you have to shift the map. When holding the button it asks which tool you prefer to set as default for later use.
More map tools are accessible from the Main Menu > More functions. The selection of maps to display is provided by the Map Manager.
manual/user_guide/maps_mainscr_ctrl.1473943906.txt.gz · Last modified: 2016/09/15 14:51 by mstupka
Except where otherwise noted, content on this wiki is licensed under the following license: CC Attribution-Share Alike 4.0 International
