Translations by gtranslate.io
Sidebar
manual:user_guide:points:management
This is an old revision of the document!
Table of Contents

Points Management
Data Manager
All independent points in Locus Map are managed in Points tab of the Data Manager. The Points tab can be accessed directly by:
- Main menu > Points

- Functions panel > points button
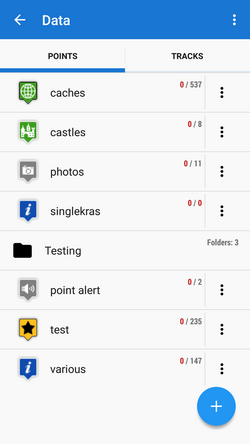
Points Tab displays all folders and groups in a column. Each folder line consists of an icon, a folder name, number of visible/stored points and and ![]() action menu button.
action menu button.
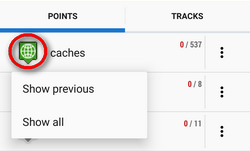
Icon - tapping it opens an option to load all previously visible points or all points in the folder. Once all points were selected, it just switches between all visible/all invisible.
Folder name - tapping it unfolds the folder
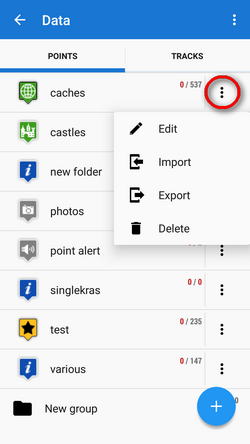
![]() action menu button:
action menu button:
 Edit - here you can insert folder into a group if there is any created and edit folder icon, name and style on map
 Import - adds new points into the folder by importing them
 Export - exports all points in the folder, see more in Points Export
 Delete - deletes whole folder
Each group line contains the group name and number of folders allocated in it.

Adding new points and folders

 Add new point - adds a new point on the map, see more in Adding new points >>
  Shoot a new point - turns the device camera on to take a picture and save as a new point, see more in Adding new points >>
 Add new folder - points in Locus Map are stored in folders to group more points of similar topic in one place. Folders can be handled as one object and some operations can be performed only on points in one folder. Sorting them, filtering them etc.
- Icon&name - here the folder icon and name is set. There is a wide selection of Locus and Garmin styled icons available for precise distinguishing of folders
- Style on map - sets the behavior of this folder points information labels/screens on the map
- Global settings - the point labels/screens behavior submits global settings made in Settings > Maps > Points&Tracks
- Never - points information labels/screens are activated only by tapping the points
- On hover - points display the label when aimed by the map screen center cross
- Always - points always display the label
![]()
Top panel menu
- Import - launches simplified Locus file manager for points import, see more in Points Import.
- Deselect all - quickly deselects (makes them invisible on the map) all selected points across all folders (it deselects tracks as well as this menu is common for both categories)
- Groups - folders can be further structured into groups. Tap
 to create a new group. After creating it you can rename or delete it in the same window.Groups are available only in Locus Map Pro version
 - User guide - launches a relevant chapter of the User guide.
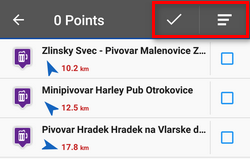
Points Folder
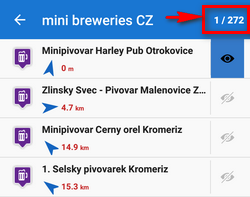
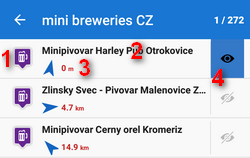
After tapping a folder the points display in a vertical list. The topbar displays visible/total number of points. Each line consists of:
- icon - either the same as the folder in case the point is created by you or different in case the point is imported - tapping the icon displays point on map
- point name - tapping it opens a point detail screen
- bearing and distance to the point from the current position of the map cursor
 “eye” button - switches point in/visibility on the map - visible points are highlighted blue
Points list bottom panel
The bottom bar contains following controls:
- Add new point - opens a dialog screen to add a new point, see more in Adding new points<html><br><br></html>
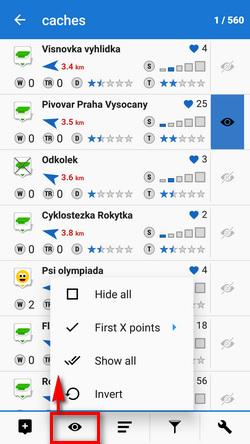
- Multi-point display selector - multi-selection of points to display or apply tools at:
- Hide all - makes all points in the folder invisible on the map
- First X points - shows a predefined number of first points in the list (50, 100, 200… points)
- Show all - makes all points in the folder visible on the map
- Invert - inverts current selection, useful when you want to select almost all points except some. Select those and then invert the selection.
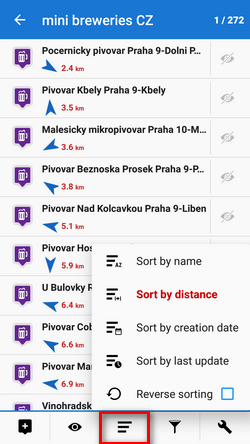
 Sort by button:
- Sort by name - sorts points alphabetically
- Sort by distance - sorts points by distance from actual map screen center (actual GPS position in case it is fixed and centered)
- Sort by creation date - sorts points by their creation date/time
- Sort by last update - sorts points by the date/time of their last update
- Reverse sorting - switches sorting into reverse mode<html><br><br></html>
Geocaching - folders with geocaches contain this option for further sorting methods, see more in Geocaching
 Filter button - opens a filter dialog window. Its topbar contains filter-applying button and a menu offering showing the filtering result in the map and clearing the filter.
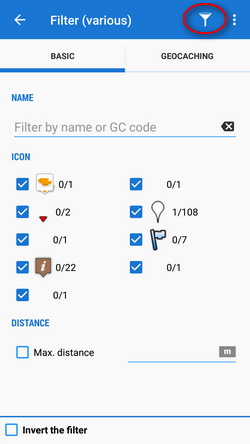
The filter dialog window content then changes according to the type of points the folder contains but basic categories are as follows:- Name - filtering based on a given string of characters - fulltext check
- Icon - displays all kinds of icons in the folder. Set the filter by un/checking them.
- Max. distance - filters points according to maximum distance from current map screen center.
- Invert the filter - inverts the filter settings<html><br><br></html>
Geocaching tab - contains further filtration methods, see more in Geocaching
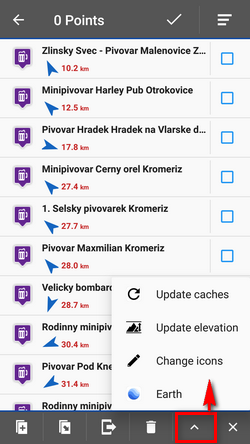
 Tools button - changes the top and bottom bars and displays other controls. On the right side, there are checkboxes for selection of points to work with:
- top panel - displays number of selected points to apply tools to, sort-by button and confirmation button
- bottom panel:
 copy to - copies selected points to different folders
 move to - moves selected points to different folders
- export - exports selected points (see more in Points Export)
- delete - deletes selected points
 other controls:
- fill elevation - fills elevation of selected points on map online or from downloaded SRTM data
- change icons - changes icons of selected points
- Earth - exports selected points into Google Earth if it is installed on the same device
- a few geocaching tools if the folder contains geocaches - Update caches, GC Offlinizer or Load GC Vote, see more in Geocaching
 - cancels Tools menu screen
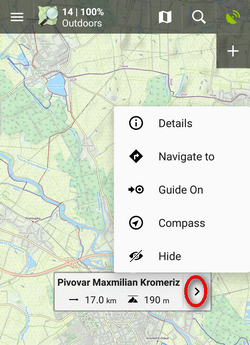
Point Map Label
After tapping the point on the map a label appears. It contains the point name, distance from current position, elevation (if relevant data are available), a thumbnail of attached image (if there is any) and ![]() “more options” button:
“more options” button:
- Point detail - unfolding individual screen with detailed information about the point (the same as when you tap the label itself)
- Navigate to - opens the navigation dialog to calculate route to the point. See more in Navigation.
- Guide on - starts guiding to the point. See more in Guidance
- Compass - opens the compass screen and starts guiding to the point showing its azimuth and distance
- Hide - hides the point from the map
Tapping the label launches the Point Detail Screen:
Point Detail Screen
The point detail screen is divided into a few sections:
- top panel with the point name
- basic info tab that contains:
- map preview of the point. Tapping it switches into the map screen with the point in the middle. The map preview can be switched off by tapping the arrow in the bottom right corner.
- point folder icon and name, number of visible/all points in folder and “>” leading to the folder
- point coordinates and a location selector switch - tapping the coordinates opens a popup for editing coords and coordinate system. Location selector can change location of the point by several methods.
- description, photos, date of creation, address, altitude, links, phone etc.
- attachment tab

contains associated files. To add some, tap the button in the topbar:- take a photo - takes a picture with your phone or tablet camera
- select a photo - selects a photo in your phone memory - the attached photo can be used as the point icon - tap the menu next to the photo and select Set as icon
- record an audio - makes a voice recording by the phone or tablet microphone
- select an audio - attaches an audio file from your phone memory
- shoot a video - makes a video recording by the phone/tablet camera
- select a video - attaches a video from your phone memory
- select other files - selects other files in your phone memory to attach to the point
- bottom panel:
 map switch - centers the map at the point
 navigation button - opens a menu of navigating tools available within Locus or other navigation apps installed in your device.
Android OS offers an internal system where each application “registers itself” as a receiver of certain information - in this case coordinates. Locus Map tests all applications in your device and if they are able to receive coordinates they are listed in this menu.
- Navigate to - opens the navigation dialog to calculate route to the point. See more in Point-to-point Navigation.
- Compass - opens the compass screen and starts guiding to the point showing its azimuth and distance
- Guide on - starts guiding to the point. See more in Guidance to a point
 Share options and add-ons
- opens a menu of installed add-ons (e.g. Geocaching4Locus addon) and point sharing options:

More about particular sharing options HERE >>- point management button
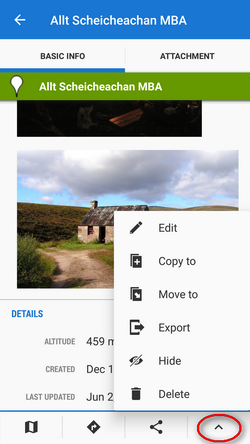
- offers editing (name, description), copying, moving, exporting, hiding (removing from the map) and deleting the point (erasing from the point database - this action cannot be reversed!)
manual/user_guide/points/management.1496745358.txt.gz · Last modified: 2017/06/06 12:35 by mstupka
Except where otherwise noted, content on this wiki is licensed under the following license: CC Attribution-Share Alike 4.0 International
