Translations by gtranslate.io
Sidebar
manual:advanced:map_tools:mobac
Table of Contents
Creating Offline Maps With Mobac
MOBAC is not a product of Asamm Software so we do not take any responsibility for changes in its usage. This article is for general information only.
Basic information
MOBAC (Mobile Atlas Creator) is a software that allows to obtain data from online map servers and transform these data to offline atlases.
How to
- Download and install MOBAC
- Run MOBAC and choose RMaps SQLite format

- Select map, zoom levels and areas you want to download
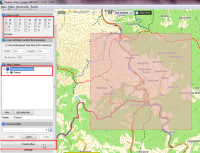
- Create Atlas
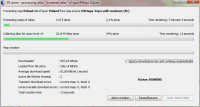
- Mobac creates a SQLite DB file (offline atlas) in location: mobac_folder/atlases
- Copy the created file to the folder Locus/maps in your device
- Start Locus Map
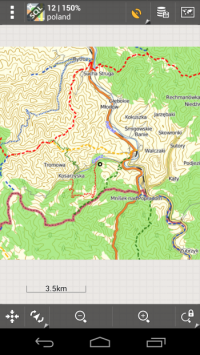
- Locus Map automatically imports the new SQLite DB file. Go to Main Menu > Map Manager > Offline tab and select the new map
Note: for more information see Locus forum
Other info on this topic extracted from Locus forum (Asamm Software does not take any responsibility for correctness of the following information):
How to Create Maps on PC with "Mobile Atlas Creator"
Basic information
Author: brotbuexe (sven)
Forumlink: http://forum.locusmap.eu/viewtopic.php?f=44&t=1896
Locus version (min): 2.3.0
Created: 2012/05/07
Introduction
You can use Mobac to download map tiles and create whole maps for just layer maps for offline use in Locus. Layer maps you could use to overlay data on another map, for example Hiking paths, or public transport routes.
You can do this on your PC, you don't have to use your phone. Its Java so it runs on a lot of platforms.
website: http://mobac.sourceforge.net
some basics: http://mobac.sourceforge.net/quickstart/index.htm
For Locus you should use “RMaps SQLite” as output format.
MOBAC comes with some providers, like Locus. But you can use a lot of custom providers. Like the layers from the maps forum.
Mobac caches the tiles in its own Databases (see tilestore directory in mobac folder) named by the <name> Tag you use. You can, if you use the same <name> tag also create multilayer maps with that maps without having to reload already downloaded tiles.
Custom maps provider configuration for tileservers are a lot like they are configured in Locus.
Documentation of the Custom Provider Format:
http://sourceforge.net/apps/mediawiki/mobac/index.php?title=Custom_XML_Map_Sources
Howto create custom Mapsources for MOBAC from your Locus providers.xml
1. Get the providers.xml from Locus (after you used the Locus addon “Locus Map Tweaker” available in Google Play Store). It is located in /sdcard/locus/mapsOnline/custom.
2. Open it in Notepad.
3. Search for the Provider you want to use in MOBAC.
Example:
  ...
     <provider id="10021" type="0" visible="true" background="-1">
        <name>Google</name>
        <mode>Satellite</mode>
        <area></area>
        <url><![CDATA[http://khm0.google.com/kh/v=83&hl=en&x={x}&y={y}&z={z}]]></url>
        <zoomPart>{z}-8</zoomPart>
        <zoomMin>8</zoomMin>
        <zoomMax>28</zoomMax>
        <tileSize>256</tileSize>
     </provider>
  ...
4. Create a new File <Providername>.xml in MobacProgramdir\mapsources
If Mobac located in c:\mobac, the File should be c:\mobac\mapsources\googlesat.xml
Add this template to the new File:
  <?xml version="1.0" encoding="UTF-8" standalone="yes"?>
  <customMapSource>
     <name>PROVIDERNAME</name>
     <maxZoom>18</maxZoom>
     <tileType>PNG</tileType>
     <tileUpdate>None</tileUpdate>
     <url>PROVIDERURL</url>
  </customMapSource>
PROVIDERNAME = The Name of the Provider (should not be already used) PROVIDERURL = the string from the <url> Tag from the providers.xml
Inside the url, Locus uses variables like {x}, they have to be changed to {$x}. Just add the $.
The file in the example should be:
  <?xml version="1.0" encoding="UTF-8" standalone="yes"?>
  <customMapSource>
     <name>Google Satelitte</name>
     <maxZoom>18</maxZoom>
     <tileType>PNG</tileType>
     <tileUpdate>None</tileUpdate>
     <url><![CDATA[http://khm0.google.com/kh/v=83&hl=en&x={$x}&y={$y}&z={$z}]]></url>
  </customMapSource>
When you open Mobac you should be able to select the new MapProvider from the list on the top left.
This should be done for every simple Map Provider. Some Providers with multiple layers are a bit complicated. Some that don't use the simple Tileserverstructure could be not working.
If you have a {s} in the url, this is for load balancing. Inside the <provider> tag in the providers.xml there should also be a <serverpart> tag. Just copy this to the custom provider.xml.
Now: Change {s} to {$serverpart} Change <serverPart> to <serverParts> Change </serverPart> to </serverParts> Change the ; inside the <serverparts> tag to a space.
Example from providers.xml:
     <provider id="10020" type="0" visible="true" background="-1">
        <name>Google</name>
        <mode>Classic</mode>
        <area></area>
        <url><![CDATA[http://mt{s}.google.com/vt/lyrs=m@140&hl=en&x={x}&y={y}&z={z}]]></url>
        <serverPart>0;1</serverPart>
        <zoomPart>{z}-8</zoomPart>
        <zoomMin>8</zoomMin>
        <zoomMax>27</zoomMax>
        <tileSize>256</tileSize>
        <attribution><![CDATA[(c)2011 Google - Map data (c)2011 Tele Atlas]]></attribution>
        <extraHeader><![CDATA[User-Agent#Mozilla/5.0 (Windows NT 6.1; WOW64; rv:7.0.1) Gecko/20100101 Firefox/7.0.1]]></extraHeader>
        <extraHeader><![CDATA[Referer#http://maps.google.com/]]></extraHeader>
     </provider>
The xml:
  <?xml version="1.0" encoding="UTF-8" standalone="yes"?>
  <customMapSource>
     <name>Google Classic</name>
     <maxZoom>18</maxZoom>
     <tileType>PNG</tileType>
     <tileUpdate>None</tileUpdate>
     <url><![CDATA[http://mt{$serverpart}.google.com/vt/lyrs=m@140&hl=en&x={$x}&y={$y}&z={$z}]]></url>
     <serverParts>0 1</serverParts>
  </customMapSource>
Now the last thing. If you want, you could set the correct maxZoom. Just get the maxZoom from the Locus Provider, use the <zoomPart> to calculate the correct value and set it in the CustomMapsource. For the last example, this would be 27-8 = 19. So you should be set <maxZoom> to 19 instead of 18.
For a complete documentation of the Custom Map Source format:
If you have problems feel free to post in this thread: http://forum.asamm.cz/viewtopic.php?f=44&t=1896
But still, you should not download too much tiles. Its possible that MOBAC is already blocked, or it could be for you and other users too if you batchdownloading 100k tiles…
Create a Layermap for Locus
To create simple layer map, use a custom map source like:
  <?xml version="1.0" encoding="UTF-8" standalone="yes"?>
  <customMapSource>
     <name>Cycleroutes Overlay</name>
     <maxZoom>18</maxZoom>
     <tileType>PNG</tileType>
     <tileUpdate>None</tileUpdate>
     <url>http://tile.lonvia.de/cycling/{$z}/{$x}/{$y}.png</url>
  </customMapSource>
This will create transparent maps that only have Cycling routes.
If you download layers like cycleroutes, you would get download errors because of the fact that tiles that don't have anything to show (no route on them) didn't exist. Just mark the “Ignore download errors” in the atlas creation dialog when you started the creation…
Example of a Multilayer Map
A Cyclemap with hillshade integrated
Code: Select all
  <?xml version="1.0" encoding="UTF-8" standalone="yes"?>
  <customMultiLayerMapSource>
      <name>Cyclemap with double Hills and contours (Ger)</name>
      <tileType>PNG</tileType>
      <layers>
          <customMapSource>
              <name>OSM Cycle Map</name>
              <minZoom>0</minZoom>
              <maxZoom>18</maxZoom>
              <tileType>PNG</tileType>
              <tileUpdate>None</tileUpdate>
              <url>http://a.tile.opencyclemap.org/cycle/{$z}/{$x}/{$y}.png</url>
              <backgroundColor>#000000</backgroundColor>
          </customMapSource>
          <customMapSource>
              <name>HikebikemapRelief</name>
              <minZoom>0</minZoom>
              <maxZoom>18</maxZoom>
              <tileType>PNG</tileType>
              <tileUpdate>None</tileUpdate>
              <url>http://toolserver.org/~cmarqu/hill/{$z}/{$x}/{$y}.png</url>
          </customMapSource>
      </layers>
  </customMultiLayerMapSource>
Splitting Sqlitedb
Basic information
Author: brotbuexe
Forumlink: http://forum.locusmap.eu/viewtopic.php?f=43&t=2372&p=16249#p15964
How to
You could use this sqlite in mobac again and create smaller files from this source, for example split by zoom levels.
When you put them in one folder locus will use them as one map.
If one zoom level is still too big you could try to recompress the tiles for this zoom level inside mobac.
<?xml version="1.0" encoding="UTF-8"?>

<!--
Example custom map definition that uses an existing SQLite based atlas.
Supported atlas formats are RMaps, MBTiles, BigPlanetTracks, NaviComputer and OSMAND.
Not supported are: OruxMaps and Osmdroid
-->

<localTileSQLite>
	<!-- Map source name as it appears in the map sources list. -->
	<name>Custom SQLite atlas</name>

	<!-- File path to SQLite atlas file -->
	<sourceFile>D:\MOBAC\LocalTiles\Region.Mapnik.sqlitedb</sourceFile>

	<!-- The atlas type has to be specified manually
	Possible values: RMaps, MBTiles, BigPlanetTracks, NaviComputer or OSMAND
	Not that this field is case sensitive! -->

	<atlasType>OSMAND</atlasType>
	<backgroundColor>#000000</backgroundColor>

	<!-- optional: Specify the image type: PNG JPG or GIF (supported since MOBAC 1.9.1)
	By default this value is detected automatically if not specified. -->

	<!-- <tileImageType>PNG</tileImageType> -->
</localTileSQLite>
manual/advanced/map_tools/mobac.txt · Last modified: 2015/09/01 18:18 by mstupka
Except where otherwise noted, content on this wiki is licensed under the following license: CC Attribution-Share Alike 4.0 International
